Good Foundation
Each panel is now made with 1/4-inch mdf, 1-inch birch plywood, and cotton muslin. The birch plywood is ripsawed to 1-3/4-inch strips which become what some call the 'cradle.' The birch cradle is cut to length, glued with premium Titebond III, and mounted to 1/4-inch thick mdf panel.
After an initial set period of 10 minutes, spring clamps are added. You can buy clamps at very low prices nowadays. For my 2" deep panels, I use 6" spring clamps, like these, as they can usually open up to about 2-1/4 inches.
The birch cradle edges are tight-fitted and butt-jointed. The joint is glued and nailed with two 2-inch 18g brad nails, like these from Dewalt. I find that this is satisfactory as the cradle's function is to maintain a uniformly straight panel and carries little weight (the glue is rated at 4000 psi). My compressor is the studio perfectly quiet quiet, 60 decibel Rolair JC10 Plus. Glad I did my research on it as my old Senco was leaking, after 15 years of service, and was quite a bit noisier, as well as kicked on more because of its smaller 1 Gallon tank. My Rolair has a 2.5 Gallon tank. Perfect.
The entire panel: front, back, and sides -cradle included, is then sealed with Golden 100% acrylic medium, also known as GAC 100. This creates the sheen you see in this image. The sealer keeps out atmospheric moisture, and seals in any remaining gas contained by the 1/4-inch mdf panel. On this point, I store my mdf sheets, upright, for at least a year before they are cut into panels, allowing them to offgas.
After that first application of GAC 100, another layer is applied as a glue (or sizing) to the face of the panel, muslin at the ready. The sheet of muslin is then pressed firmly into the wet acrylic medium, and then the panel flipped, face down. Acrylic medium is then applied to the cradle sides, muslin pressed firmly, 'stretched' and stapled around the back edges of the cradle: one side, then the opposite, then the adjacent, then its opposite. I have no photos of this because it the acrylic sets fast, requiring my full attention.
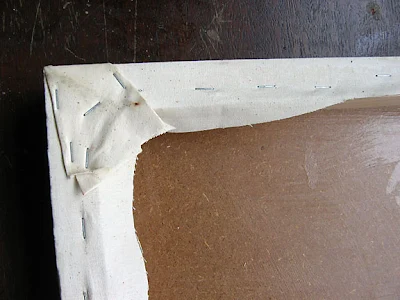
Once all four sides are stretched and stapled, I can then fold and staple my corners. These are also 'glued' down with the acrylic medium. Typically I fold the edges over to the top and bottom, freeing the sides from visible folds. On this panel, I chose the opposite because I am mounting it atop another panel and wanted the gap between to be a minimum.
I then flip the panel onto its back. I apply another layer of acrylic medium, covering the face and sides while the layer under the muslin is still somewhat wet. I press this layer into the face of the muslin to integrate it with the acrylic below. The entire method is designed to achieve a tight, smooth face and side, with absolutely no wrinkles, no bubbles. Here you see the folded sides -two staples are added to keep the muslin flat more than to maintain the stretch.
This is the surface of the glued (or sized) cotton muslin. The muslin has natural imperfections, which I take wet sandpaper to after the first coat of white ground has dried.
Here is the entire panel, 24 x 49 inches, stretched and glued, ready for the white ground.
There is much debate over the use of time worn and contemporary techniques, and this is especially true in regards to grounds, gesso, and sizing. To use animal glues (animal rights, absorbs moisture, precise mixtures), to use oil grounds (too inflexible, too thick, destroys canvas), to use acrylic medium or PVA (too unknown), to use acrylic grounds with oil paints (impermanent), and on and on. There are extreme traditionalists and practitioners who have, in the face of so much ethereal imagery, given in to carelessness. I believe that my practices lie somewhere on the line between these two, having chosen to mix a hard, inflexible support (mdf panel) with flexible, contemporary grounds and glue (acrylic) that minimize the transfer of moisture, minimize physical movement of the support and paint.
The cloud covered moon on Monday night, just before the storm, from my studio.


Comments
Post a Comment
Go ahead and comment! I will moderate and delete the spam. Thx