Gathers No Moss
A couple of weeks ago I was courted by a couple I know from my years at Skowhegan. We see each other from time to time at events revolving around the folks from the program and we would get to talking about gardening. At a party for a couple leaving for the west coast, they told me about a large tree that had come down. More recently a neighbor had built an extension with roof deck that overlooks their fingerling yard. This inspired them to ask me to come by for an appraisal.
I am particularly busy right now, but they contacted me during a particularly difficult week at work (a story for another day, March was too full of lousy things). The opportunity to stretch some old muscles and envision an escape route from my day job was all I needed to sign on.
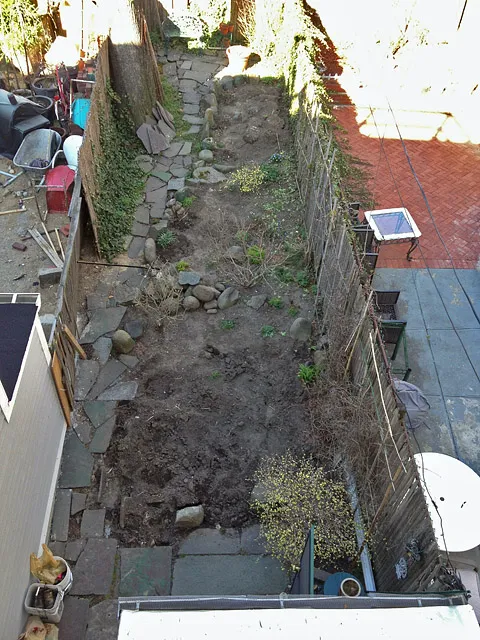
The layout had been seventy percent garden, thirty paving. The site will have expanded paving in one area, but less in another, while all paving becomes more usable. Two years ago there was a large tree towards the back, south side, shading the whole yard. It has since come down and the yard is now very sunny by the after noon. You can see the small roof deck on the left.
The job amounts to utilizing on site flagstone and boulders for a retaining wall and patio near the house, while expanding a garden bed in back. There may be a pergola/arbor built in autumn for shade and screening depending on the neighbor's use of the roof deck. The owners removed garden plants to a nursery towards the back, clearing the path for our excavation.
All these stones were removed for use in the new patio, a term the owner rejects. Excavated soil was placed here for the new garden bed.
At the end of the first day we had all paving stones removed, the patio bed excavated (mostly), and 2/3 of the bedding material on site.
The next morning we brought in the bedding sand and remaining gravel, now 65 bags in total, or put another way, over 3200 pounds. Mixing my own bedding material was Larry's (of J&L Landscaping) idea given the problems around getting 1.5 ton of bulk crusher run into Brooklyn on a Saturday. It was a lot more labor, made all the worse because the DeKalb Home Depot had zero gravel, stone, or sand in stock. What? Not only was that location just 10 minutes away, but their website said they had it all. Silly me, I had physically checked stock at the Hamilton Avenue store, and that is where I ended up going, at the cost of time and money.
My helper had to take off before noon on Sunday, so the rest was up to me. First task was to use a laser to perfect the soil level that had been generally excavated the day before. This extra soil was dumped on the path.

Boulders rise up out of the soil like whales surfacing the ocean. The owner did not commit to having them removed or hammered, so I worked around them and planned on a thinner bed where they rise up. Is it better to have them removed? Yes, but everyone makes choices, and this one they can live with.
After laying out landscape fabric (its need always in question; there's no harm in using it), I mixed and spread the different size, angular stones and construction sand (not mason or play sand) over the 9 by 10 foot area, raking for general level.
Then wielded the tamper, which is a bit of exercise, but really you should let gravity do the work. I brought the landscape fabric up the sides of the excavation so that it would rest behind the large stones that will be placed to retain the soil. In front of the tamper is the fabric covering the largest boulder, just below the four-inch bedding mix ceiling. A one-inch layer of bedding sand will be placed over this bedding mix.
The patio bed has a slight pitch toward a drain just beyond the corner, but the remaining flagstone and concrete against the house slopes quite aggressively toward the neighbor's house. In order to avoid a tripping transition between the old and the new, I will have to creatively transition the newly laid stone with the old. Removing all the stones and concrete would have made for a level patio, from house to retaining wall, but the owner wasn't interested in tearing up the old concrete.
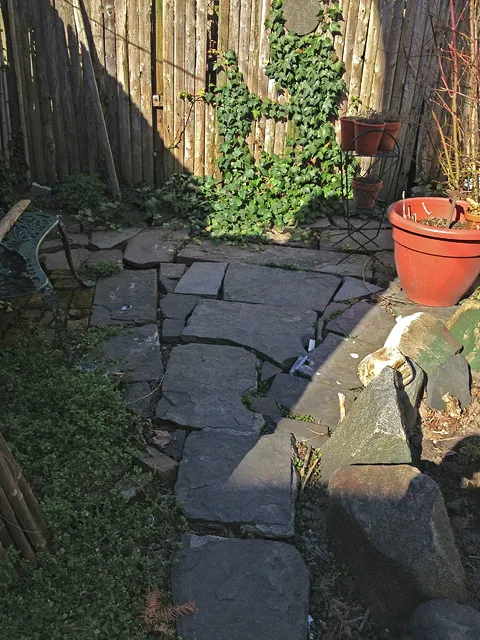
It was requested that this stone become a seat in the center of that very sloping transition. It was the largest stone of the day, taking all my effort to get it in place from across the yard. My hope is that it not only works as a seat, but somehow aids the transition between the old and the newly placed paving stones.
Using the stones on site, I pieced together a retaining wall. It may seem counter intuitive, but when setting the stones in gravel it is often advantageous to set the stone onto its smallest point. This allows the greatest height and girth to be at the top so that more soil is retained. Just make sure the stone is well-seated in the gravel and locked in by neighboring stones.
Fitting stones isn't art or science.
Just look at all the available stones with an eye for lines that merge well with the last stone set.
This is how I left it, Sunday. I will return next weekend to place the bedding sand and lay patio stones.


.jpg)


You are very good.
ReplyDeleteYou are very nice!
DeleteThat's some serious work, Frank! How's your back? Plus the stair climbing for pictures :-)
ReplyDeleteLooks great...
The back's ok. Fingers were sore, but that cleared up the next day. It's quite vertical, but I only go up once at the end of the day. :-)
DeleteLove seeing work in progress, and hearing about the evolution of design in the small.
ReplyDeleteGarden design is the toughest task for me.urban flooring
ReplyDelete