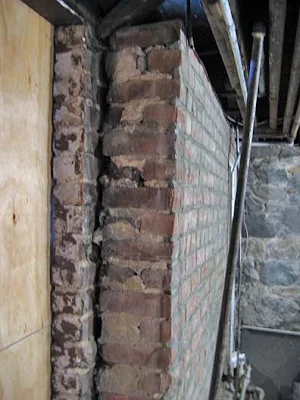
As I mentioned previously, the house had a rubble foundation, with a front and rear wall of brick mounted atop a rubble footing. At the rear of the house, a pit as deep as the basement was tall and about 4 feet wide. There was a door and a window opening to the pit from the basement, but the door had been sealed up with some wood framing long ago. The pit had a concrete staircase leading to the back yard.
The front brick wall had two caged windows and a steel door, no doubt necessary during Williamsburg's rougher days. A small staircase to the basement lie next to a brick wall, with the adjacent rubble foundation wall jutting out 10 or 12 inches at the 2nd to last step. The floor was concrete, but how thick was any one's guess. The fireplaces belonging to the two chimneys were located in the basement as well. Underneath the small kitchen extension at the rear of the house was a boiler room with gas furnace and hot water heater.
There had been an apartment built out in the basement. The loose partitions separating the living spaces had since been removed, but so had the central beam supporting the joists and walls above. The plumbing was jerry-built into the existing subfloor drain pipe, which was likely made of terra-cotta and probably broken. If I were to have had my druthers, I would have torn up that floor to replace the subfloor drain while I was working on the foundation. Three years later I was called back in to help with the replacement of that subfloor drain. It was, in fact, broken, leaking, backed-up.
My first task was to begin the process of re-pointing the foundation. I began in early June, doing the outside first so that I could wrap it up before it got too hot. I used a 4-inch grinder with a masonry disc to excavate any hard old mortar, although much of it had turned to sand. In the rear wall, the brick walls had de-laminated, so that the outer layers were pulling away from the inner course of bricks. Where necessary, I removed bricks and re-lay them with fresh mortar.
So it is with old brick that you must make your own mortar! Older bricks are often softer bricks and modern mortars are fairly hard. Hard mortars shoved in between soft bricks can crack them. I used lime to soften my mix, using a recipe from a book in order to approximate an older, softer mortar.
The west facing rubble wall cried every time it rained. I needed to tackle that from the inside and outside (more on that in another post). The hardest part of re-pointing the rubble foundation was excavating the sand from the irregular gaps between the field stones and then replacing it satisfactorily with wet mortar. The challenge was greater towards the back where the wall was painted white and even more so behind the tangle of 4-inch waste pipes in the northwest corner of the basement.
I re-pointed the entire exterior of the foundation and parts of the interior -at which point I needed to move onto other problems. I hired a young guy that I worked with at the summer art program in Maine who thought he'd like to try construction work over kitchen work. I was hesitant, though softened by his earnest confidence, gave him a pointing trowel, and asked him to finish the interior. I needed to keep on him like a dog, which he disliked, especially when I popped out his "re-pointed" lines and told him to do it again, this time packing it in. Matt was always way smarter than his skill-set was capable, and learned to hate pointing real fast. I, on the other hand, felt satisfied knowing that this foundation was becoming sound. It was about this time that Ben, with whom I worked on the previous 4-story, came on board to help with the carpentry.
The back foundation wall had serious problems. Not only was it coming apart, it was leaning inward. We removed the window and the doorway framing, deciding then to tear out the brick wall to the left of the window and replace it with 2 x 8 treated lumber. Before we could tackle this, however, we needed to shore up the rear wall of the house. Two truck-sized hydraulic bottle jacks replaced the support of the demolished brick wall.
 In the image above you can see the inside of the basement, the cast iron waste pipes, and the wooden sill at the rear of the house. This sill had been partially replaced sometime in the past, made obvious by the newer dimensional lumber on the right.
The remaining sill was in pretty bad shape, having rotted away on the east side. It was clear that we should replace the whole sill, going ahead with a load-bearing header made of two glued and nailed pieces of 3 x 10 douglas fir.
 Once the sill was installed, we could then frame out the back basement wall with treated lumber and plywood.
Next: Chapter 3, The Horse Run
 Once the sill was installed, we could then frame out the back basement wall with treated lumber and plywood.
Next: Chapter 3, The Horse Run


Jeepers.
ReplyDeletecreepers.
ReplyDelete